6. Making your first ARMI-based App
In this tutorial we will build a nuclear analysis application that runs (dummy) neutron flux and thermal/hydraulics calculations. Applications that do real analysis can be modeled after this starting point. A complete, working version of this application can be found here.
We’ll assume you have the ARMI Framework installed already. You can make sure it is ready by running the following command in a shell prompt:
(armi) $ python -c "import armi;armi.configure()"
You should see an ARMI splash-screen and an ARMI version print out. If you do, you are ready to proceed.
Tip
If you are having trouble getting it installed, see Getting Help. You may
need to ensure your PYTHONPATH variable includes the armi installation directory.
Note
This tutorial is a companion for the Making ARMI-based Apps developer documentation.
6.1. Starting a new app
ARMI-based applications can take on many forms, depending on your workflow. Examples may include:
Application and plugins together under one folder
Application in one folder, plugins in separate ones
We will build an application that contains one plugin that runs neutronics and thermal hydraulics in one folder. This architecture will be a good starting point for many projects, and can always be separated if needed.
From the command line, cd into a new directory where you’d like to store your
application code. Make a folder structure that works as a normal Python package, and create some empty
files for us to fill in, like this:
my_armi_project/
    myapp/
        __init__.py
        __main__.py
        app.py
        plugin.py
        fluxSolver.py
        materials.py
        thermalSolver.py
    doc/
    pyproject.toml
    README.md
    LICENSE.md
These files are:
The outer
my_armi_projectroot directory is a container for your app. The name does not matter to ARMI; you can rename it to anything.The inner
myappdirectory is the actual Python package for your app. Its name is the Python package name you will use to import anything inside (e.g.myapp.plugin).myapp/__init__.pytells Python that this directory is a Python package. Code in here runs whenever anything in the package is imported.myapp/__main__.pyregisters the application with the ARMI framework and provides one or more entry points for users of your app (including you!) to start running it. Since code here runs when the package is used as a main, it generally performs any app-specific configuration.myapp/app.pycontains the actual app registration code that will be called by__main__.py. This can be named anything as long as it is consistent with the registration code.myapp/plugin.pycontains the code that defines the physics plugins we will createmyapp/fluxSolver.pycontains the flux solvermyapp/thermalSolver.pycontains the thermal/hydraulics solverpyproject.tomlthe python package installation file to help users install your application.README.mdandLICENSE.mdare an optional description and license of your application that would be prominently featured, e.g. in a GitHub repo, if you were to put it there.doc/is an optional folder where your application documentation source may go. If you choose to use Sphinx you can runsphinx-quickstartin that folder to begin documentation.
6.2. Registering the app with ARMI
The ARMI Framework contains features to run the “main loop” of typical applications. In
order to get access to these, we must register our new app with the ARMI framework. To do
this, we put the following code in the top-level __main__.py module:
myapp/__main__.pyimport armi
from myapp import app
armi.configure(app.ExampleApp())
Similar code will be needed in scripts or other code where you would like your app to be used.
Tip
You may find it appropriate to use the plugin registration mechanism in some cases rather than the app registration. More info on plugins vs. apps coming soon.
6.3. Defining the app class
We define our app in the myapp/app.py module. For this example, the app class is
relatively small: it will just register our one custom plugin. We will actually create
the plugin shortly.
Apps vs. plugins vs. interfaces
ARMI-based methodologies are broken down into three layers of abstraction. Apps are collections of plugins intended to perform analysis on a certain type of reactor. Plugins are independent and mixable collections of relatively arbitrary code that might bring in special materials, contain certain engineering methodologies, and/or Interfaces with one or more physics kernels. See Framework Architecture for more info on architecture.
myapp/app.py"""Application module"""
from armi import __version__ as armi_version
from armi.apps import App
from myapp import __version__ as myapp_version
from myapp.plugin import DummyPhysicsPlugin
class ExampleApp(App):
name = "example-app"
def __init__(self):
# activate all built-in plugins
App.__init__(self)
# register our plugin with the plugin manager
self._pm.register(DummyPhysicsPlugin)
@property
def splashText(self):
return f"""
+===============================================+
+ +
+ |\/| /| +
+ | |\//-||)|) +
+ / | | +
+ +
+ Version: {myapp_version} +
+ +
+-----------------------------------------------+
+ Powered by ARMI (R) -- Version: {armi_version} +
+===============================================+
"""
6.4. Defining the physics plugin
Now we will create the plugin that will coordinate our dummy physics modules.
What are plugins again?
Plugins are the basic modular building block of ARMI-based apps. In some cases, one plugin will be associated with one physics kernel (like COBRA or MCNP). This is a reasonable practice when you expect to be mixing and matching various combinations of plugins between related teams. It is also possible to have a plugin that performs a whole cacophony of analyses using multiple codes, which some smaller research teams may find preferable. The flexibility is very broad.
See armi.plugins more for info.
Plugin code can exist in any directory structure in an app. In this app we
put it in the myapp/plugin.py file.
Note
For “serious” plugins, we recommend mirroring the armi/physics/[subphysics]
structure of the ARMI Framework physics plugin subpackage.
We will start the plugin by pointing to the two physics kernels we wish to register. We
hook them in and tell ARMI the ORDER they should be run in based on the built-in
STACK_ORDER attribute (defined and discussed here). We will come back to this plugin definition later on to
add a little more to the plugin.
myapp/plugin.pyfrom armi import interfaces
from armi import plugins
from armi.interfaces import STACK_ORDER as ORDER
from armi.settings.fwSettings.globalSettings import CONF_VERSIONS
from myapp import __version__
from myapp import fluxSolver
from myapp import settings
from myapp import thermalSolver
class DummyPhysicsPlugin(plugins.ArmiPlugin):
@staticmethod
@plugins.HOOKIMPL
def exposeInterfaces(cs):
DummyPhysicsPlugin.setVersionInSettings(cs)
kernels = [
interfaces.InterfaceInfo(ORDER.FLUX, fluxSolver.FluxInterface, {}),
interfaces.InterfaceInfo(
ORDER.THERMAL_HYDRAULICS, thermalSolver.ThermalInterface, {}
),
]
return kernels
@staticmethod
@plugins.HOOKIMPL
def defineSettings():
return settings.defineSettings()
@staticmethod
@plugins.HOOKIMPL
def defineSettingsValidators(inspector):
return settings.defineValidators(inspector)
@staticmethod
@plugins.HOOKIMPL
def defineCaseDependencies(case, suite):
DummyPhysicsPlugin.setVersionInSettings(case.cs)
@staticmethod
def setVersionInSettings(cs):
"""Helper method to set the version correctly in the Settings file."""
cs[CONF_VERSIONS]["armi-example-app"] = __version__
6.5. Defining custom settings
An important facet of the above plugin is that it takes custom Settings, and has some
validation built in for those Setting values. That is, the plugin registers new
settings that can go in the settings file, and help the user define how the simulation
runs.
The following example boiler plate code defines three settings. We define two simple
number settings (inlet and outlet temperatures), and we use Query to define validation on those settings. Here,
the validation isn’t very exciting, we just make sure the temperatures are above zero.
That’s not particularly physically meaningful, but serves as a simple example. The next
setting is a little more complicated, we define a setting myAppVersion that defines
a specific version of our app that this setting file is valid for. And if you try to run
a different version you get a nasty warning printed to the screen.
myapp/settings.py"""Settings related to the DummyPhysicsPlugin"""
from armi.operators.settingsValidation import Query
from armi.settings import setting
CONF_INLET_TEMPERATURE = "inletInC"
CONF_OUTLET_TEMPERATURE = "outletInC"
def defineSettings():
"""Define DummyPhysicsPlugin settings."""
settings = [
setting.Setting(
CONF_INLET_TEMPERATURE,
default=360.0,
label="Inlet Temperature (Celcius)",
description="The Inlet Temperature in C, for the TH solver.",
),
setting.Setting(
CONF_OUTLET_TEMPERATURE,
default=520.0,
label="Outlet Temperature (Celcius)",
description="The Outlet Temperature in C, for the TH solver.",
),
]
return settings
def defineValidators(inspector):
"""Define validators for the DummyPhysicsPlugin settings."""
return [
Query(
lambda: inspector.cs[CONF_INLET_TEMPERATURE] < 0.0,
"The inlet temperature is below 0. This is unphysical and will result in unphysical results.",
"",
inspector.NO_ACTION,
),
Query(
lambda: inspector.cs[CONF_OUTLET_TEMPERATURE] < 0.0,
"The outlet temperature is below 0. This is unphysical and will result in unphysical results.",
"",
inspector.NO_ACTION,
),
]
6.6. Creating the physics kernels
So far we have basically been weaving an administrative thread to tell ARMI about the code we want to run. Now we finally get to write the guts of the code that actually does something. In your real app, this code will run your own industrial or research code, or perform your own methodology. Here we just have it make up dummy values representing flux and temperatures.
6.6.1. Making the (dummy) flux kernel
In a previous tutorial, we made a function that sets a dummy flux to all parts of the core based on a radial distance from the origin. Here we will reuse that code but package it more formally so that ARMI can actually run it for us from a user perspective.
The interface is responsible largely for scheduling activities to run at various time
points. For a flux calculation, we want it to compute at every single time node, so we use
the armi.interfaces.Interface.interactEveryNode() hook.
These interaction hooks can call arbitrarily complex code. The code could, for example:
Run an external executable locally
Submit an external code to a cloud HPC and wait for it to complete
Run an internal physics tool
Here it just does a tiny bit of math locally.
myapp/fluxSolver.pyimport numpy as np
from armi import runLog
from armi import interfaces
from armi.reactor.flags import Flags
class FluxInterface(interfaces.Interface):
name = "dummyFlux"
def interactEveryNode(self, cycle=None, timeNode=None):
runLog.info("Computing neutron flux and power.")
setFakePower(self.r.core)
def setFakePower(core):
fuelBlocks = core[0].getBlocks(Flags.FUEL)
topFuelZ = fuelBlocks[-1].spatialLocator.getGlobalCoordinates()[2]
bottomFuelZ = fuelBlocks[0].spatialLocator.getGlobalCoordinates()[2]
coreMidPlane = (topFuelZ - bottomFuelZ) / 2.0 + bottomFuelZ
center = np.array([0, 0, coreMidPlane])
peakPower = 1e6
mgFluxBase = np.arange(5)
for a in core:
for b in a:
vol = b.getVolume()
coords = b.spatialLocator.getGlobalCoordinates()
r = np.linalg.norm(abs(coords - center))
fuelFlag = 10 if b.isFuel() else 1.0
b.p.power = peakPower / r**2 * fuelFlag / b.getSymmetryFactor()
b.p.pdens = b.p.power / vol
b.p.mgFlux = mgFluxBase * b.p.pdens
6.6.2. Making the thermal/hydraulics kernel
Since we told the ARMI plugin to schedule the flux solver before thermal/hydraulics solver
via the ORDER attribute, we can depend on there being up-to-date block-level power
state data loaded onto the ARMI reactor by the time this thermal/hydraulics solver gets
called by the ARMI main loop.
We’ll make a somewhat meaningful (but still totally academic) flow solver here that uses energy conservation to determine an idealized coolant flow rate. To do this it will compute the total power produced by each assembly to get the required mass flow rate and then apply that mass flow rate from the bottom of the assembly to the top, computing a block-level temperature (and flow velocity) distribution as we go.
myapp/thermalSolver.pyfrom armi import interfaces
from armi import runLog
from armi.reactor.flags import Flags
from myapp.settings import CONF_INLET_TEMPERATURE
from myapp.settings import CONF_OUTLET_TEMPERATURE
class ThermalInterface(interfaces.Interface):
name = "dummyTH"
def interactEveryNode(self, cycle=None, timeNode=None):
runLog.info("Computing idealized flow rate")
for assembly in self.r.core:
runThermalHydraulics(assembly, self.cs)
def runThermalHydraulics(assembly, cs):
massFlow = computeIdealizedFlow(assembly, cs)
computeAxialCoolantTemperature(assembly, massFlow, cs)
def computeIdealizedFlow(a, cs):
# compute required mass flow rate in assembly to reach target outlet temperature
# mass flow rate will be constant in each axial region, regardless of coolant
# area (velocity may change)
coolants = a.getComponents(Flags.COOLANT)
# use ARMI material library to get heat capacity for whatever the user has
# defined the coolant as
tempAvg = (cs[CONF_OUTLET_TEMPERATURE] + cs[CONF_INLET_TEMPERATURE]) / 2.0
coolantProps = coolants[0].getProperties()
heatCapacity = coolantProps.heatCapacity(Tc=tempAvg)
deltaT = cs[CONF_OUTLET_TEMPERATURE] - cs[CONF_INLET_TEMPERATURE]
massFlowRate = a.calcTotalParam("power") / (deltaT * heatCapacity)
return massFlowRate
def computeAxialCoolantTemperature(a, massFlow, cs):
"""Compute block-level coolant inlet/outlet/avg temp and velocity."""
# solve Qdot = mdot * Cp * dT for dT this time
inlet = cs[CONF_INLET_TEMPERATURE]
for b in a:
b.p.THcoolantInletT = inlet
coolant = b.getComponent(Flags.COOLANT)
coolantProps = coolant.getProperties()
heatCapacity = coolantProps.heatCapacity(Tc=inlet)
deltaT = b.p.power / (massFlow * heatCapacity)
outlet = inlet + deltaT
inlet = outlet
b.p.THcoolantOutletT = outlet
b.p.THcoolantAverageT = (outlet + inlet) / 2.0
6.7. Adding entry points
In order to call our application directly, we need to add the __main__.py file to
the package. We could add all manner of entry points here
for different operations we want our application to perform. If you want to add
your own entry points, you have to register them with the
armi.plugins.ArmiPlugin.defineEntryPoints() hook. For now, we can just inherit
from the default ARMI entry points (including run) by adding the following code
to what we already have in myapp/__main__.py:
myapp/__main__.pyimport sys
from armi.cli import ArmiCLI
def main():
code = ArmiCLI().run()
sys.exit(code)
if __name__ == "__main__":
main()
Tip
Entry points are phenomenal places to put useful analysis scripts that are limited in scope to the scope of the application.
6.8. Running the app and debugging
We are now ready to execute our application. Even though it still contains an issue, we will run it now to get a feel for the iterative debugging process (sometimes lovingly called ARMI whack-a-mole).
We must make sure our PYTHONPATH contains both the armi framework itself as well as
the directory that contains our app. For testing, an example value for this might be:
$ export PYTHONPATH=/path/to/armi:/path/to/my_armi_project
Windows tip
If you’re using Windows, the slashes will be the other way, you use set instead of
export, and you use ; to separate entries (or just use the GUI).
Submodule tip
In development, we have found it convenient to use git submodules to contain the armi
framework and pointers to other plugins you may need. If you do this, you can set
the sys.path directly in the __main__ file and not have to worry about
PYTHONPATH nearly as much.
Make a run directory with some input files in it. You can use the same SFR input files we’ve used in previous tutorials for starters (but quickly transition to your own inputs for your own interests!).
Here are the files you can download into the run directory.
Then, run your app!:
(armi) $ python -m myapp run anl-afci-177.yaml
The code will run for a while and you will see your physics plugins in the interface stack, but will run into an error:
NotImplementedError: Material Sodium does not implement heatCapacity
The included academic Sodium material in the ARMI material library doesn’t have any heat capacity! Here we can either add heat capacity to the material and submit a pull request to include it in the ARMI Framework (preferred for generic things), or make our own material and register it through the plugin.
Yet another way
You could alternatively make a separate plugin that only has your team’s special material properties.
6.8.1. Adding a new material
Let’s just add a subclass of sodium in our plugin that has a heat capacity defined. Make
your new material in a new module called myapp/materials.py:
myapp/materials.pyfrom armi import materials
from armi.utils.units import getTc
class Sodium(materials.Sodium):
def heatCapacity(self, Tk=None, Tc=None):
"""Sodium heat capacity in J/kg-K"""
Tc = getTc(Tc, Tk)
# not even temperature dependent for now
return 1.252
But wait! Now there are two materials with the name Sodium in ARMI. Which will be
chosen? ARMI uses a namespace order controlled by
armi.materials.setMaterialNamespaceOrder() which can be set either
programmatically (in an app) or at runtime (via the materialNamespaceOrder user
setting). In our case, we want to set it at the app level, so we will yet again add
more to the myapp/__main__.py file:
myapp/__main__.pyfrom armi import materials
materials.setMaterialNamespaceOrder(["myapp.materials", "armi.materials"])
Why __main__.py?
We put this line in __main__.py rather than __init__.py so it only activates
when we’re explicitly running our app. If we put it in __init__ it would
change the order even in situations where code from anywhere within our app
was imported, possibly conflicting with another app’s needs.
Now ARMI should find our new updated Sodium material and get past that error. Run it once again:
(armi) $ python -m myapp run anl-afci-177.yaml
Tip
You may want to pipe the output to a log file for convenient viewing with
a command like python -m myapp run anl-afci-177.yaml > run.stdout
6.9. Checking the output
Several output files should have been created in the run directory from that past command.
Most important is the anl-afci-177.h5 HDF5 binary database file. You can use this file
to bring the ARMI state back to any state point from the run for analysis.
To visualize the output in a 3D graphics program like ParaView
or VisIT,
you can run the ARMI vis-file entry point, like this:
(armi) $ python -m myapp vis-file -f vtk anl-afci-177.h5
This creates several VTK files covering different time steps and levels of abstraction
(assembly vs. block params). If you load up the block file and plot one of the output
params (such as THcoolantOutletT you can see the outlet temperature going nicely
from 360 °C to 510 °C (as expected given our simple TH solver).
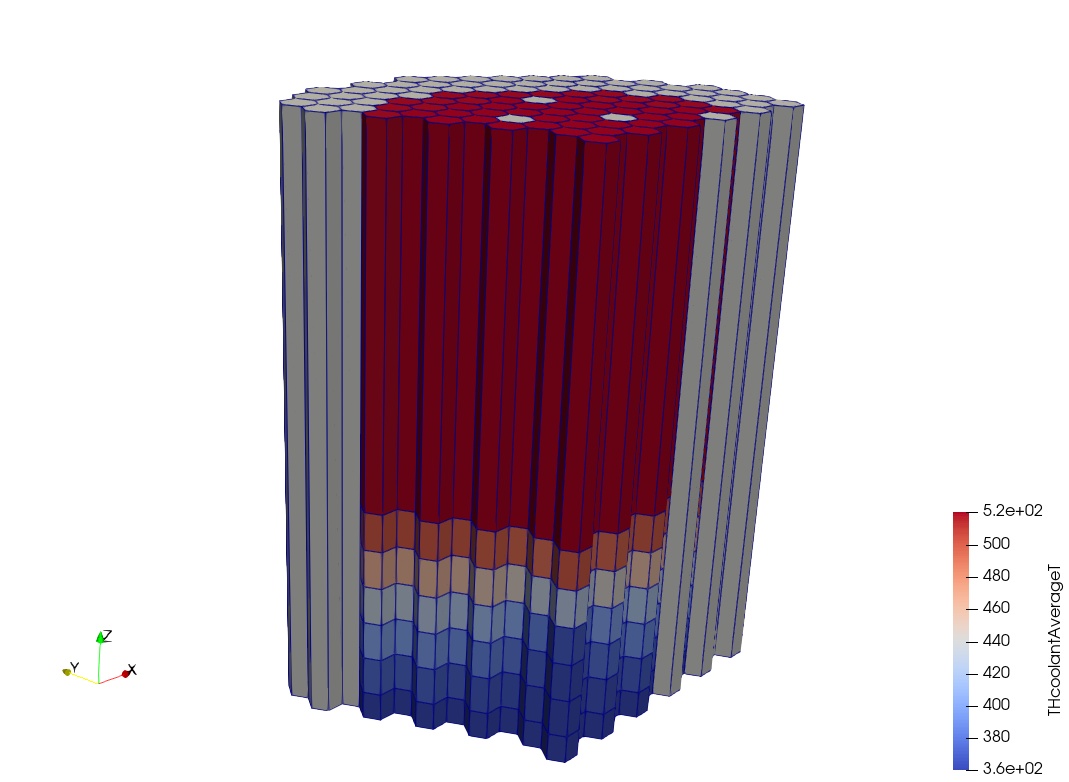
The coolant temperature as seen in ParaView viewing the VTK file.
Fancy XDMF format
The -f xdmf produces XDMF files
that are lighter-weight than VTK, just pointing the visualization
program to the data in the primary ARMI HDF5 file. However it is slightly more
finicky and has slightly less support in some tools (looking at VisIT).
A generic description of the outputs is provided in Outputs.
You can add your own outputs from your plugins.
6.10. Bonus: Ad-hoc UserPlugins
It will often be the case that you are not building an ARMI application from scratch, but
you are using a pre-existing ARMI application. And while working with this (potentially
quite large) ARMI application, you want to add a one-off change. Maybe you want to make a
special plot during the run, or do a quick “what-if” modification of the
Reactor. These things come up for scientific
or engineering work: a quick one-off idea you want to test out and probably only use once.
This is where a UserPlugin come in.
There are two parts to defining a UserPlugin:
6.10.1. Define the UserPlugin in Python
This can be done by subclassing armi.plugins.UserPlugin:
from armi import plugins
from armi.reactor.flags import Flags

class UserPluginExample(plugins.UserPlugin):
    """
    This plugin flex-tests the onProcessCoreLoading() hook, and
    arbitrarily adds "1" to the power ever each fuel block.
    """

    @staticmethod
    @plugins.HOOKIMPL
    def onProcessCoreLoading(core, cs, dbLoad):
    for b in core.getBlocks(Flags.FUEL):
        b.p.power += 1.0
In most ways, UserPluginExample above is just a normal
ArmiPlugin. You can implement any of the normal
ArmiPlugin hooks, like:
exposeInterfaces(),
defineParameters(), and so on. The
UserPlugin class is more limited than a
regular plugin though, you cannot implement:
6.10.2. Define a list of UserPlugins in the Settings File
In order for your simulation to know about your custom
UserPlugin you need to add a line to your Settings
file:
userPlugins:
  - armi.tests.test_user_plugins.UserPlugin0
  - //path/to/my/pluginz.py:UserPlugin1
  - C:\\path\to\my\pluginZ.py:UserPlugin2
What we have above is actually an example of including three different plugins via your settings YAML file:
By providing a
.-separated ARMI import path (if you included yourUserPluginin your commit.By providing a full Linux/Unix/MacOS file path, then a colon (
:), followed by the class name.By providing a full Windows file path, then a colon (
:), followed by the class name.